At the top of the Rally Course Designer is a Main Menu, which allows you to perform certain actions. You can create, open, save and close Event Files using items under the File menu. Once you create or open an Event File, you may add courses to that Event File. You add a course to an Event File, delete a course from an Event File, and copy a course using the items under the Courses menu. When you create a new course, you will be prompted for the rule set you want to use, the level of course, the type of course (trial, match, etc.), and on some registries whether the course will be run indoors or outdoors. It will create the course with a tabbed box on the left for organizing information associated with the course. There is a good deal of information in this tab that will appear on the course map print-outs. First, let's look at the course map.
On the right side, the course is set up with any required signs - always the Start and Finish, and often with required jump, honor, or bonus signs. Required signs can not be deleted from the course.
| WHEN IN DOUBT, RIGHT-CLICK!!! |
| Right-Click on the Signs Right-Click on the Course Map Right-Click on the Borders Right-Click on the Accessories |
Right-Click on Signs
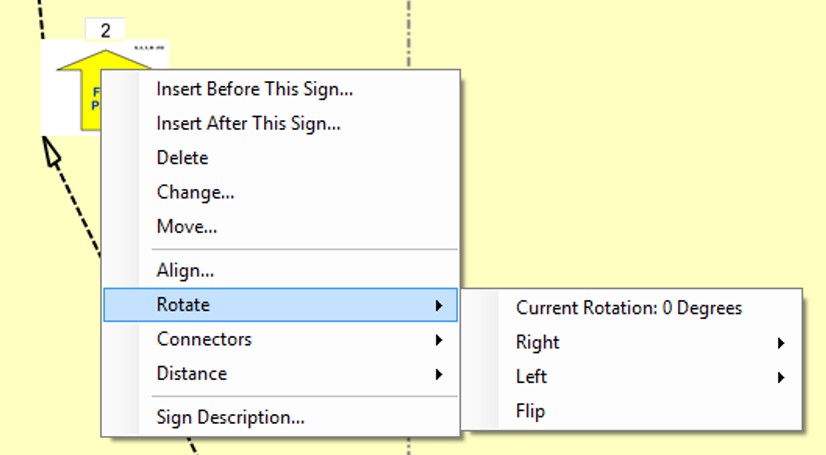
 You can right-click on a sign to bring up a menu of actions you can perform.
- You can add another sign to the course, either before or after the sign you just clicked on.
- You can see what angle the sign is currently rotated and rotate it from its current position.
- For signs that aren't required on the course, you can change them into other signs.
- You can move the sign to another place in the sequence of signs on the course.
- You can change where the connecting arrows connect to the sign.
Right-Click on the Course Map
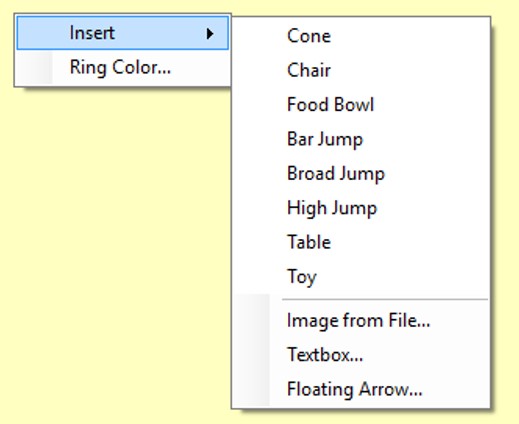
 Right-click anywhere else on the Course Map for course options.
- You can add in accessories. The standard accessories include a cone, food bowl, chair, bar jump, broad jump, high jump, table, and toy, although not all of the selections are available on every course.
- You may also insert any .JPG or .PNG image onto the course. Right-click on any of the standard accessories or the images for the options to resize or delete them.
- Instructors may like inserting textboxes on the course. Right-click on these to set the text, size, color, font and styling of the text within the textbox.
-
 Insert a floating arrow.
These are not locked onto signs, so they may be moved anywhere on the course.
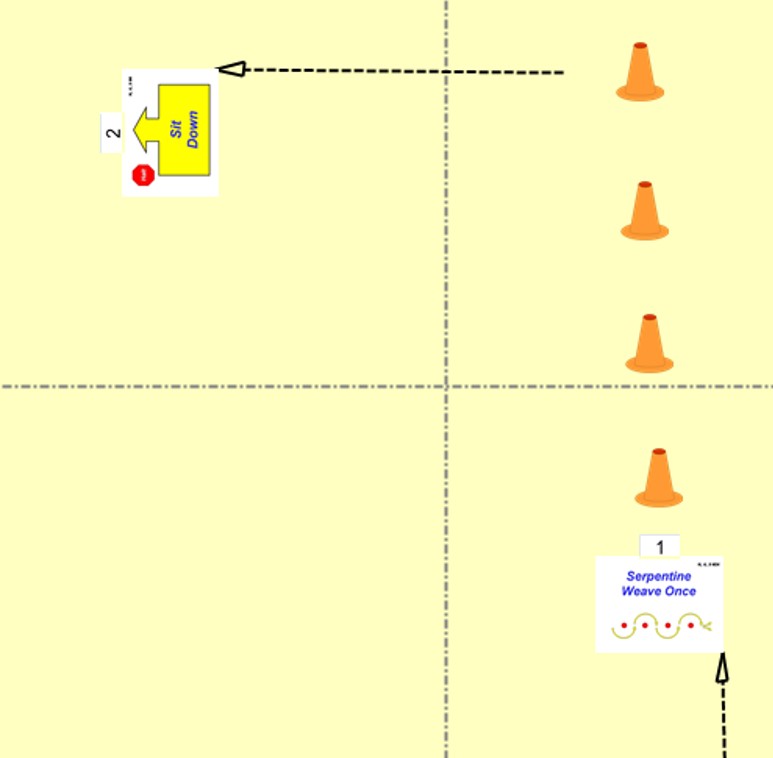
A good use for this is to replace the connecting arrow for stations like the weave one direction.
Hide the connecting arrow between this sign and the one that follows it.
Then add a floating arrow and position the tail at the end of the weave and the head at the next sign on the course.
You can right-click on floating arrows to change their thickness, color, and style (solid, dotted or dashed).
When a floating arrow is highlighted, you'll see circles at each end that you can grab with the mouse to move the floating arrow's end points.
 - You can change the color of the course map.
Right-Click on the Course Map Border
 After putting in all of your signs, you will want to add ring gates and accessories (cones, food bowls, jumps) to the course map.
If you right-click on any of the borders of the Course Map, you can add a Ring Gate onto the course.
Ring Gates are either Entrances, Exits or Both.
Right-click on the Ring Gate for the option to delete it.
Left click and drag it to anywhere along the side to which it's attached.
Proximity
Many registries either suggest or insist that signs be placed a minimum distance apart from each other. If this is the case for the registry you are working on, then the arrow connecting two signs placed too close together will be colored either yellow or red and a warning or error will show up on the error list above the station list. If the registry has a firm rule that signs can't be too close and your course is an official one (trial, match or show and go), then the arrow will appear in red and the condition will be flagged as an error. Otherwise, the arrow will appear in yellow and the condition will show up as a warning. The warnings and errors will include the distance between the signs. Keep in mind that the distance between signs is determined by centers of the signs. So, larger signs might have a shorter arrow between them, but that won't change the center-to-center distance.Some registries that have proximity constraints may also allow exceptions to these rules. These are often called married signs. Married signs are allowed to be close to each other. In fact, married signs will share a sit between them. For example, you might want a Halt-Down-Sit sign on the course, followed by a Halt-Walk Around sign to be married and placed right next to each other. These would be performed tohgether, such that the second sit from the first sign is the halt/sit on the second sign. The team would perform the exercises together, ending up performing a Halt-Down-Sit-Walk Around.
If the signs are not marked as married and they are placed right next to each other, the the program would draw a (short) yellow or red arrow between them and mark the condition in the error list. But if the the level allows signs to be married, then that option will show up on the drop-down list when you right-click on the signs and a column will appear on the station list showing married signs. In this example, we would right-click on the Halt-Down-Sit sign and select the Marry to Following Sign... item. This will mark the two signs on the station list as married, will draw the arrow between them in black and will not mark a warning or error in the station list. Some registries may limit the number of signs that can be married together; in such cases, the option to marry will not always be available.
More About the Main Menu
You may copy the selected course to another course elsewhere on this Event File or any other open Event File. When you do, you may change the level of the course you are creating. Signs that don't exist at the new level won't show up in the new course and signs required on the new course are added.
Course Information
The status box at the top left of the course area displays green if the course meets all of the course design criteria. If it doesn't and the course is an official type (trial, match, or show & go), the status box will display red. If the course doesn't meet the criteria and the course type is an unofficial one (class, seminar, or clinic), the status box will display yellow. The criteria that the course does not meet are displayed at the top of the Stations tab.
The left side of the screen holds a tab box that contains lots of information about the course.
- The Course tab contains fields that show what Rule Set File was used for this course, along with a button that will display details about the Rule Set File being used. Only one registry has different ring size limits based on whether the course is being run indoors or outdoors, but there's a field available if you'd like to specify that. If the registry runs different classes within the level, they can be listed, too. If the registry assigns numbers for the event's courses, those can be stored, along with the date the course will be run. Below those all of that are fields that allow you to change the size of the course, and the type of background lines on the course (gridlines, crosshairs, or none). You can also change the thickness and spacing of the gridlines, if the course is using them.
- The Host tab contains fields about the hosting organization, which is applicable for both judges and instructors. There are text fields for the hosts's name, abbreviation, and website. Press the button to bring up the host's website, if the machine is connected to the internet. Click on either of the logo boxes and it will prompt you for an image file that can be used on print-outs. Judges should consider using the logos for the club and for the registry.
- The Author tab contains all text fields: Author, Judge, Copyright, and Comments fields comprise this set.
- At the top of the Stations tab is a list of the warnings and errors found on the course. Warnings are displayed in yellow and errors in red. Below that is the list of stations for the course. The columns on this table include the Station Number, the Sign Number, the Sign's Description, whether the sign is Stationary, and whether the sign is required or not. Other columns may or may not be displayed, depending on the rules defined in the Rule Set File. These include: whether the signs may be Married; whether the sign is a Start, Finish, Honor, or Bonus; anyPoints associated with the sign; and if the sign has had its points Doubled. To display or hide any of the columns, right-click on the white square at the upper-left of the Station List.
- The Options tab allow you to change the look of the course map.
Included are:
- Checkboxes that can hide the Station Numbers and Connecting Arrows.
- The size of the signs on the course (small, medium, or large).
- The border style for the signs (no lines, thin line, or shadow).
- The location to place signs being added to the course (half-way between the surrounding signs or relative to the selected sign).
If you are creating a course from scratch, you probably want to set this option to Relative to the Selected Sign.
Then, create your course by starting at the Start sign and adding a sign after it.
Follow that with another sign after the sign you just added, and so on, until you get enough signs on your course.
At the end, reposition your Finish sign.
However, if you are updating a course, you might want to select the Between Surrounding Signs option. Each time you insert a sign, it will place the new sign relative to both the signs before and after it, pointing toward the sign that follows. - The weight for arrows that connect the signs (thin, medium, or thick).